Tuesday, November 18, 2014

Stitch Fix Review - Nov. 2014

Hey ladies! (This blog post is for you...or possibly some amazing person that would make the big effort to fill out a style profile and purchase this for their significant other or friend)!

Ever heard of Stitch Fix?
If not, it is an personal shopper website that is super convenient and fun. You fill out a thorough style profile (sizes, style preferences, likes and dislikes, etc) and you can leave your stylist a personal note asking for a specific item or a style you are wanting to try. What is great about Stitch fix is that you can link your Pinterest board, Twitter, and Linkedin for your stylist to look at and get a better sense of who you are. I give my stylist direct links to pictures of outfits I like and they do their best to send you something close from their inventory.

I just received my 5th Stitch Fix box in the mail. I have my boxes coming every 2-3 weeks (you can also choose monthly). I thought I would make my photos festive with my Christmas Tree I already put up. I was excited. Plus recieving a Stitch Fix box is kinda like getting a Christmas gift every month...so It's fitting. (See what I did there? haha)
Here is what the box looks like:


Every Stitch Fix box includes a prepaid envelope to send back any items you do not want FOR FREE!! It's so convenient. I love it. Also, your stylist includes a note and photos of outfit ideas for the items she sends. Every box includes 5 items, usually 4 apparel and 1 accessory item (necklace, scarf, bag, etc).


This month I let my stylist know I was heading to Portland for Thanksgiving and would like some warmer/fall pieces of clothing to wear there! This stylist (Stephanie) really listened when I asked for a soft plaid scarf and those aztec printed cardigans I see everywhere now!


You also receive a list of the retail price of each item. Every box is a $20 styling fee. If you keep 1 or more items you minus $20 from the retail price! So it is an incentive to keep at least 1 item so you don't lose your $20! If you love and purchase all 5 items you get 25% off! 

Stephanie included 4 apperal items and a plaid scarf I asked for in this Stitch Fix box. 
My November 2014 box included:
1. Viper Plaid Split Neck Blouse (Red Plaid flowy shirt)
2. Faye Skinny Gray Skinny Jean
3. Galvin Short Sleeve French Terry Gray Dress
4. Shelbie Graphic Knit Aztec Printed Gray) Cardigan
5. Alpine Plaid Wrap Multicolored Scarf

I love trying on all the pieces and deciding what to keep and send back. 


She did include a lot of gray in this box, so I will probably note that or check gray as a color to not include in my style profile on StitchFix.com. It is VERY important that you write feedback about each piece when you check out on StitchFix.com. That way the stylists will get to know you better each time and pick out pieces you will love. 

1. 
I know I wont be keeping the Viper Plaid Split Neck Blouse (Red Plaid flowy shirt because it isn't my style. It is very large and flowy. I don't like oversized shirts that hang on me. It isn't flattering. The shirt was also pretty low cut. 

2. 
I won't be keeping theFaye Skinny Gray Skinny Jeans because they were a bit expensive and also too long. They fit my waist but seemed to be the length for a taller person. The jeans scrunched up too much which gives an illusion that I'm shorter than I really am. 

3. 
I appreciated her picking out the Galvin Short Sleeve French Terry Gray Dress. It is very different and I liked that it had pockets, had interesting asymmetrical detail, and was a sweater type fabric for autumn.  Unfortunately, I just didn't like the fit. It was a bit odd. I felt like I was wearing a potato sack that became tight around my thighs. I would suggest this dress for someone else and could see them wearing it with cute leggings. 

4. 
I am currently on the fence abut the Shelbie Graphic Knit Aztec Printed Gray/Black) Cardigan. I like the print, but it is a bit thinner fabric than I wish it were. It is also a little long on me. So I am going to compare to another sweater I will be getting soon and decide to keep it or not. It is very cute though!

5. 
I definetely will keep the Alpine Plaid Wrap Multicolored Scarf! It's very soft and long. I recently found one at Target I love, so I will either keep this scarf for myself or give it as a Christmas gift. ;)

I have 3 days to decide and send back the items I do not want. 

As always, I'm already looking forward to my next stitch fix box. I will have to think about what to put in my note for things I'd like to include in my next fix!

If you are interested in ordering a Stitch Fix box please use my referral code! 

Please let me know if you give it a try and what you think! =) 


Saturday, November 1, 2014

Iris Grace Paintings

Well Hello There,

So, I've fallen in love with this little girl named Iris Grace.


If you haven't heard of her or noticed her sudden fame on the internet (Ashton Kutcher and Zooey Deschanel have tweeted about her recently). Iris Grace is a 5 year old English lady with the extraordinary talent of painting. She is Autistic and struggles with talking and many other things we take for granted every day. But, I've noticed that many Autistic children tend to have a super power. Iris Grace has the super power of expressing herself through painting. At 3 years old, her parents tried painting as a therapy and noticed her incredible ability to paint in a style far beyond her years.

You can buy a print of her paintings and auction for originals on her website:
http://irisgracepainting.com/

Her Mother, Arabella handles all the orders herself. You can email her at:  irisgracepainting@yahoo.com
If you would like to order some Giclee prints email us with the name of the painting and the size that you would like.  Please include your full name and address. For payments we accept cheques, Bank Transfer or PayPal. Prices start at £38.00.
Here is the page for you to look at the MANY paintings by Iris Grace. It was INCREDIBLY difficult for me to choose just 1 to purchase. She currently has 63 paintings to choose from!!!!!!
http://irisgracepainting.com/paintings/ 

I purchased a Giclee Print of "Blossom in the Wind" in a 33cm x 44.5cm. (They are British so all their prices are in Pounds and dimensions are in Metric).  A Giclee print, I just learned, is "the very latest in art printing technology with fully calibrated photo-scanning, processing and printing equipment, they pay fastidious attention to colour balancing to ensure extremely accurate reproduction," according to her website. Here are the sizes of prints you can purchase:
55cm x 75cm (same size as the original 21.65 inches x 29.52 inches) £127.00
42cm x 56.5cm (16.53 inches x 22.24 inches) £92.00
50cm x 50cm (19.68 inches x 19.68 inches) £92.00
33cm x 44.5cm (12.99 inches x 17.51 inches) £57.00
23cm x 31cm (9.05 inches x 12.20 inches) £38.00
Arabella emailed me 6 days after I requested my painting and greeting cards. I paid through PayPal and 3 days later she sent my painting off to be printed. They are printed "made-to-order" style. My cards were shipped out the next day and arrived within a week. I LOVE THEM! You can buy 1 for 2£, a pack of 8, or a pack of 16 comes with free shipping, so I purchased 16!


Twelve days later Arabella emailed me letting me know my print was packaged it would be sent the next day. (She did not include any tracking information on either order). A week later I received a long cardboard triangular tube with my BEAUTIFUL painting!
(So it took about 1 month from emailing my request to receiving my painting at home)


Arabella includes a certificate with your painting name, original or print, medium & material type, and dimensions of your painting. Fancy! It's so legit.


The Iris Grace Gift Shop also sells:
2015 Calendar
Spiral Notebooks
Canvas Wrapped Prints
Keychains
Coffee Mugs
Tote Bags
Mouse Pads
Clocks
Puzzel
Small Bag Wristlet 
iPhone 4 case
iPad case
Pillows
Necklaces
Kitchen Towels
Playing Cards
Naturally, I want everything. 

Oh, and Iris Grace has the most incredible therapy cat I have ever seen. Her name is Thula (pronounced Too-la). 


Note from her website:
We wanted to share her art to raise awareness of her condition and inspire other families in similar situations to ours. Autism is currently affecting around 100,000 children in the UK and these numbers are rising. All profits from the sales of her art and products will go towards more art materials and her on going private therapists. www.irisgracepainting.com
 I recommend checking out her website and looking at her incredible paintings. I'm sure you'll fall in love with them and her (and Thula!) just like I did.

Sunday, September 21, 2014

San Francisco Road Trip

Hey There!

Our San Francisco Road Trip Video. Click to watch on Youtube. Enjoy!

My BFF, Kathryn Begle and I went on a road trip [slash] #bffadventure to SAN FRANCISCO!! We left early Saturday, August 16th around 6:00am and drove straight up I-5 to the Bay area. I must say, we made very good time and made it to the bay area by noon. We decided to take the scenic route into San Francisco by crossing the Bay Bridge (from Oakland). This was a traffic jam. The Bay Bridge is a toll road, if you didn't know. On Saturday afternoon the cost was $5.

45 minute traffic jam
$5 dollar toll
The Bay Bridge view/entrance into San Fran = priceless
(It was worth it)

We planned out our trip with an itinerary and a map colorfully marked with numbered stickers with a map key made by "MYAH." Of course, things don't always go exactly as planned (ie, time, weather, money etc) so this is how our trip itinerary ended up.

Day 1 Itinerary

1. Picnic at the Alamo Park (the Full House park) with the gorgeous and infamous Painted Ladies/San Fran skyline in the background. 
(Finding parking around the park was not difficult and I was able to keep my car here for a few hours before checking into the hotel).

2. Sweet Victorian style House searches. They are everywhere!

3. Full House house
 1709 Broderick St. 94115
The full house home is now purple from the current residents that live there. I read on yelp that they painted it purple to make it harder for tourists to find. They do not like the attention their house brings. There were constantly people coming and going to see the house. IT'S FAMOUS!

4. Parked car all weekend at Best Parking (yes, that's the name) car garage. I learned the hard way that the hotels in San Francisco charge about $50 a NIGHT to keep your car parked in their garages. There is no self parking either. So, I had to research parking garages that allow you to keep your car there over night and for long periods of time. I found this place that allowed me to make a reservation before hand (didn't seem to even matter though) and it cost $50 total for all 3 days we stayed. http://www.parkforless.org/

5. Hotel Check-in at the Westin St. Francis on Union Square
 Fancy hotel.

6. Chinatown - United States largest Chinatown. 

7. City Lights Bookstore (wasn't as awesome as BuzzFeed said it would be)

6. Unplanned discovery of DELICIOUS pizza from Golden Boy Pizza in Little Italy. 
Read my Yelp review here.
7. Extremely dramatic climb up a steep hill by Ashley (an homage to The Lion King). 
Also a Trip Video Must see!

Day 2 Itinerary

1. Haas-Lilenthal House tour
This huge house is only considered a "Upper Middle Class home" I was like, "No, this is a mansion." The tour guide was very knowledgeable about the house and taught us general knowledge of San Francisco, too. We were cultured. Kathryn was pleased. 

2. Legion of Honor Fine Art Museum (Kathryn) 

 3. Mrs. Doubtfire House (Ashley) 
2640 Steiner St. 94115
Robin Williams had JUST past away that same week so there were many people at the house leaving flowers, pictures, candles, letters, and drawings.

4. Boutique Shopping on Fillmore St. (Ashley)

5. Lombard St. 
The crookedest road in the world! It's so freakin steep they had to pave the road with switchbacks.

6. Impromptu hipster photo shoots/Dance Break
A Trip Video must see. Watch it!!

7. Fisherman's Wharf wanderings 

8. Cable Car ride
So, we learned the hard way that these are NOT free rides. I never saw a system to taking a cable car, paying some one and getting off. We were yelled at by the cable car operator to pay $6 for the ride, but the guy in the back of the car was nice enough to just let us go, because we were apparently very naive tourists. 


Day 3 Itinerary

1. Hotel Check-out 

2. Coit Tower on Telegraph Hill 
An intense hike up to see an anti-climatic tower on top of a hill with a nice view.

3. Fisherman's Wharf for lunch
We ate bread bowls with soup from Boudin Bakery.

  4. Rent Bikes
There are TONS of places to rent bikes in Fischerman's Wharf but all seem to close at 7pm. (Lame) Renting bikes was also way more expensive than I imagined it would be.


5. Ride bikes to Golden Gate Bridge
This bike ride was awesome. There is a path that runs along the water and takes you straight up to the bridge.  We stopped many times to take pictures because it kept getting better and better was we road closer to the bridge!

6. Frolic
Had to frolic in this luscious green meadow in front of the Golden Gate Bridge!

7. Retrieve car from Best Parking garage

8. Go Home =(

I LOVED SAN FRANCISCO!!!! I would move there in a heart beat if I had a job and made more money. It is my favorite city that I had ever been to. It is a beautiful city along the bay with weather ranging from 75 - 40 degrees each year. (YAY BOOT WEATHER)! I adored the architecture and the views from their mountainous hills. All the strangers were incredible kind and helpful if we needed advice or directions.
 I can't wait to go back.

Hope you enjoyed our San Francisco Trip Video!


Sunday, September 7, 2014

Perfectly Pinterest Party | DIY Geo Curtain Backdrop


Happy Birthday To Me!!!

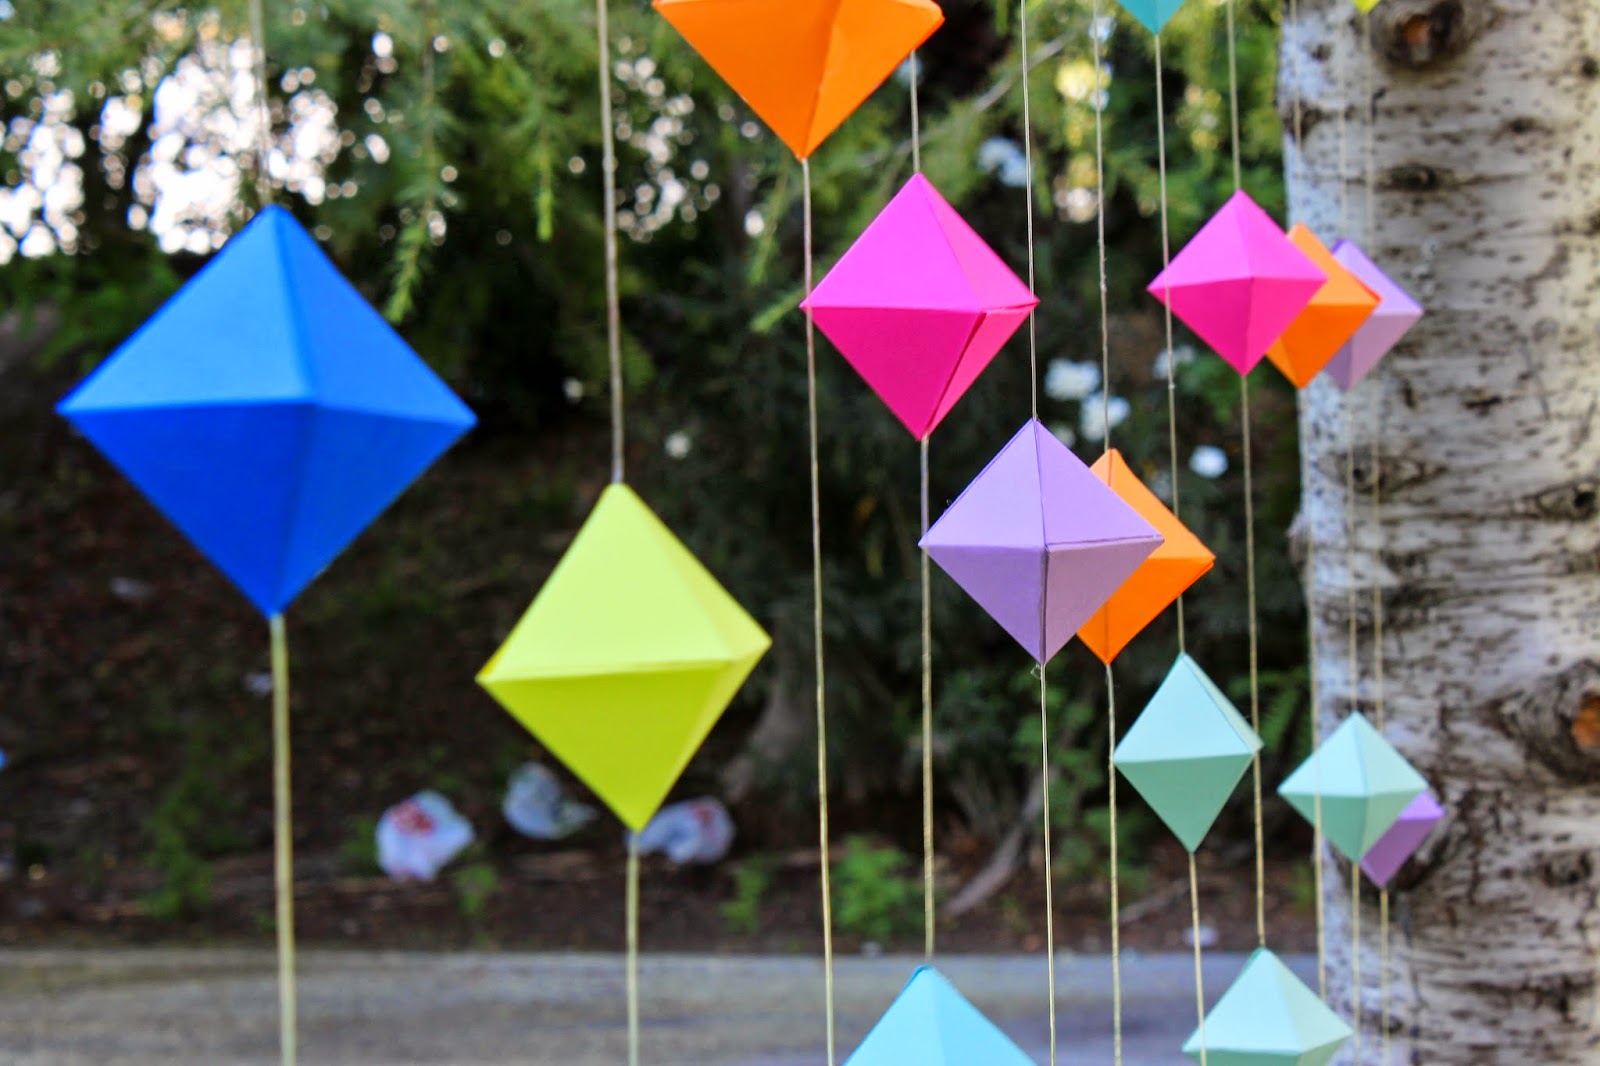
I decided to have a Big Ol' Picnic and BBQ style birthday party at Weddington Park in Studio City. I was inspired my this Geo-Curtain Photo Backdrop I saw on Pinterest. This couple used a HUGE one for their unconventional Valentine's Day wedding. You can buy the curtain off Etsy, but I decided to make my own for a much cheaper cost. 

First I found the Geo-triangle shape I needed from this lady's wonderful blog: http://www.kristimurphy.com/blog/mothers-day-diy

1. Print the triangle printable onto card stock paper (bought from Michael's) in the colors of your liking.
2. Cut out the triangle shapes and folder them along all the dotted lines.


3. Use a clear string to hang the geo shapes from. I used a clear stretchy string used for making bracelets from Michaels. Fishing line could also work. I measured out 8 foot long strands and made them all somewhat different lengths so my backdrop would have a random pattern going on.


4. Tie knots where you want your geo shapes to hang from. I spaced my triangles out at all different lengths like the one pictured on Etsy
5. This part takes practice! I figured out which order of I should glue the sides down so the string went straight through the middle of the triangles while resting on the knot that I had tied. I used a hot glue gun so it would dry instantly. 


 6. I made about 12 strands with all different color orders and spacing. 
7. I found a tree near my picnic tables to hang the strands about 4 inches apart to create my photo booth backdrop. 


It turned out really well and everyone loved it!


 =)


Wednesday, July 2, 2014

Obsessed with Lulu's


Hey ladies! (This post is definitely for you).

I've recently become obsessed with this fashion site: http://www.lulus.com/ 

Hayley and I on my 25th birthday!
I've known about it for years, but just gave it a real try before my birthday last year. I know ordering online can be kinda risky and hard to do, but I lucked out with my birthday dress. Everyone loved it! It is one of the most re-pinned (359 times) and most liked (68 times) items I posted on Pinterest. Unfortunately, it is no longer on their website for purchase. =(

My dress even inspired my friend Hayley to write a blog post on her own Fashion Blog site: http://vogueinthevalleyblog.wordpress.com/category/looks-i-love/
You can see a picture I posted from Lulu's and the review I wrote for the site.
Check it out!

That's a great thing about Lulu's! They have a review section that allows people to post what they thought about their purchase, their body type, height, and if the item runs big or small. It really comes in handy. Modcloth, another great fashion site, does this even better by allowing customers to post pictures of themselves wearing the item. It's always great to see a dress on an actual human rather than a model or body form.

My most recent successful purchase was a blue dress from Lulu's. I needed a blue dress for an Alice in Wonderland themed birthday party, but I also wanted a dress that I would wear over and over again. I LOVE THIS DRESS. It is so comfortable and cute. I am a fan of structured dresses with a fit and flair style. They are so fun to spin around in. [Girls, you know what I mean]. 

I've worn this dress many times since then. I even got stopped by a random lady on the street asking where I bought my dress. That always makes ya feel good. =) I may even wear it on the 4th of July (if I'm not working) and add some red accessories.

Price: $42 
Direct link to the dress:
http://www.lulus.com/products/home-before-daylight-bright-blue-dress/127402.html#tab-description
There you can see the dress on Lulus. Click on the review tab and scroll down to see my review of the dress along with 24 others! It also comes in other colors! 

I received these two lovely dresses in the mail TODAY
I've been wanting to invest in a mint dress and who doesn't need a Little Black Dress? I plan on wearing the mint dress to a bridal shower and the LBD for a night out for a bachelorette party. With my purchase Lulu's gave me a 15% off, so I will definitely be using that on one of these beautiful dresses below! 
My Wishlist
Lulu's also has a wishlist section that you can add any item to! Mine is full of all these dresses that I LOVE and wish I could have in my closet right now. So in the meantime, I'll just pin them on my dream closet "Pretty Little Things" Pinterest board: http://www.pinterest.com/iheart0re0s/pretty-little-things/


Why I Recommend Lulu's:
1. TONS of cute Dresses and Tops
2. Affordable & Great Quality
3. Review Section is great
4. Customer Service is FANTASTIC! (Early today I was exchanging some dresses for a different size over the phone with a nice young lady. I feel like everyone working for Lulu's are young women like me).
5. Live Chat, 24/7 Email Contact, and Toll Free Phone Number options
6. Wait. Did I mention: Exchanges and Returns are FREE by the way! 
**HUGE plus when you are trying online shopping. I never know what size I am going to be. I'm like a half size in everything. 
7. Updates for when items are Back In Stock! You can ask for an email alert for when an item is restocked or your size is available. It has been very convenient for me!
8. Located in Chino, California (nearby for me!)


Website: http://www.lulus.com/
Facebook: https://www.facebook.com/lulusdotcom
Pinterest: http://www.pinterest.com/lulusdotcom/
Twitter: @lulusdotcom
Tumblr: http://lulusdotcom.tumblr.com/
Instagram: @lulus


Sunday, June 15, 2014

Layered Cake with a Chocolate Cage (and bunting decor)!

Hey You,

I was SO EXCITED with how this cake turned out!! This is the first time I have ever baked a layered cake, yet less with awesome decorations. I was determined to make a fantastic birthday cake for my lovely friends Rachel Hall and Grant Hall. This is by far the coolest thing I've ever made.

This is how I made my cake! I'll show you in sections. 
1. Layering the cake
2. Chocolate cage
3. Bunting decoration
I made a red velvet cakes with cream cheese icing (Rachel's favorite). I bought 2 red velvet cake mix boxes and 2 cream cheese tubs from the grocery store. I just followed the instructions and ingredients from the box. Yeah, sorry...I didn't make it all from scratch. One step at a time!

I used two 9 inch circle pans to bake the layers. Their baking time was around 30 minutes.

Toothpicks were my best friend here. I used them to make sure the cakes were done in the middle and on the sides. 

The cakes rose in the oven a lot more than I thought they would. It made me sad because I knew I would have to chop off the "muffin top" to make the cakes level. 


I had to wait for both cakes to cool before cutting the muffin tops off. I did try eating a little of the remains because I felt bad for just throwing it away. It was tasty.

Next, I plopped a decent amount of icing onto the first layer to use it as glue to hold the 2 layers together.

I flipped the 2nd layer over so both cut sides (Severed muffin tops!) were facing the middle. That way I had a smooth even layer for the top of the cake!

This is where it got fun. =)

I FELT LIKE CAKE BOSS!
As "Buddy" from Cake Boss says...I "dirty iced the cake" and put it in the fridge for about 5-10 minutes.

Then I was able to put about 1.5 tubs of icing [nom] on the cake for the final layer. I did try a few icing techniques but gave up on them pretty quickly. I need to invest in some tools like Buddy has.


I didn't want it to look perfect. Especially since I determined to make the Chocolate Cage work.
So this part I was really excited about but also nervous. I didn't want to ruin my awesome cake! Making a chocolate cage is a little difficult. It's all about dimensions and timing.

I measured the circumference of my cakes to be 28 inches. I cut it in half to 14 inches because I figured it would be easier to put on the cake in 2 pieces. I also measured the height of the cake to be about 3.5 inches. I went ahead and made my Chocolate Cage Swirl template 4 inches so the chocolate would stick up higher than a cake a little bit. I used non-stick parchment paper to create my template.


I melted a lot of mini chocolate chips and scooped them into a large zip lock bag. I used this as my chocolate swirl marker by cutting the corner tip of the bag. Cut smaller than you think! I made the mistake of cutting it too big and had to start over. 

There was a lot of trial and error with this cake.

Finally I got to work and started SLOWLY swirling the chocolate in large ovals. (If you squeeze the chocolate out too quickly it comes out all squiggly and funky.


I wanted to make sure there was plenty of overlap so the chocolate would have something to hold on to. I wanted the chocolate to be thick enough to stand up once it hardened. 
My technique: Making large oval swirls from top to bottom all the way across then going BACK over them with smaller swirls on the bottom to make the chocolate cage stronger.


This is where TIMING IS KEY.

I trimmed down the parchment paper along where the chocolate started. I put both stripes CAREFULLY into the refrigerator for 3 minutes. You DO NOT want the chocolate to hardened too much. It needs to be flexible for you to bend around the cake. This part was tricky for me because my kitchen was so warm at this point. The chocolate kept melting quickly so I had to work fast. 

I put 1 chocolate strip around the cake and pushed gently into the icing. I put the cake in the fridge for a few minutes then took it out to put the second chocolate strip on. 
I left the cake in the refrigerator with the chocolate and parchment paper on for 1 hour. After an hour I was able to remove the parchment paper easily and the chocolate swirls stayed on the cake. 

I GOT SO EXCITED AT THIS POINT BECAUSE IT LOOKED SO COOL! I was extra careful and left my cake in the refrigerator for a few hours so it would not melt.

Then I had a cake photo shoot.


I had never heard of "cake bunting" before until I saw it trending on Pinterest. There are so many cool ways people use bunting to decorate all sorts of things! I decided to have mine say "Happy Birthday" and used 2 wooden skewers I bought in a pack at the grocery store.

First I found a template to help me cut out my little flags to spell out 'Happy Birthday.' I used this print out: http://www.yellowblissroad.com/printable-chalkboard-alphabet-cake/
I cut out one of the flags and traced the shape onto scrapbook paper I had. I do like the chalk board look, but I wanted something colorful for this cake. 

I used string and glued the flags around the string to spell out "Happy Birthday." I added some more colorful string pieces to make it more colorful.

The finished product looked mighty fine. ;)


How it all came together!
This cake is the coolest thing I've ever baked. I was so happy with the outcome! 
Thanks for reading!! =)