Showing posts with label DIY. Show all posts

Sunday, September 7, 2014

Perfectly Pinterest Party | DIY Geo Curtain Backdrop


Happy Birthday To Me!!!

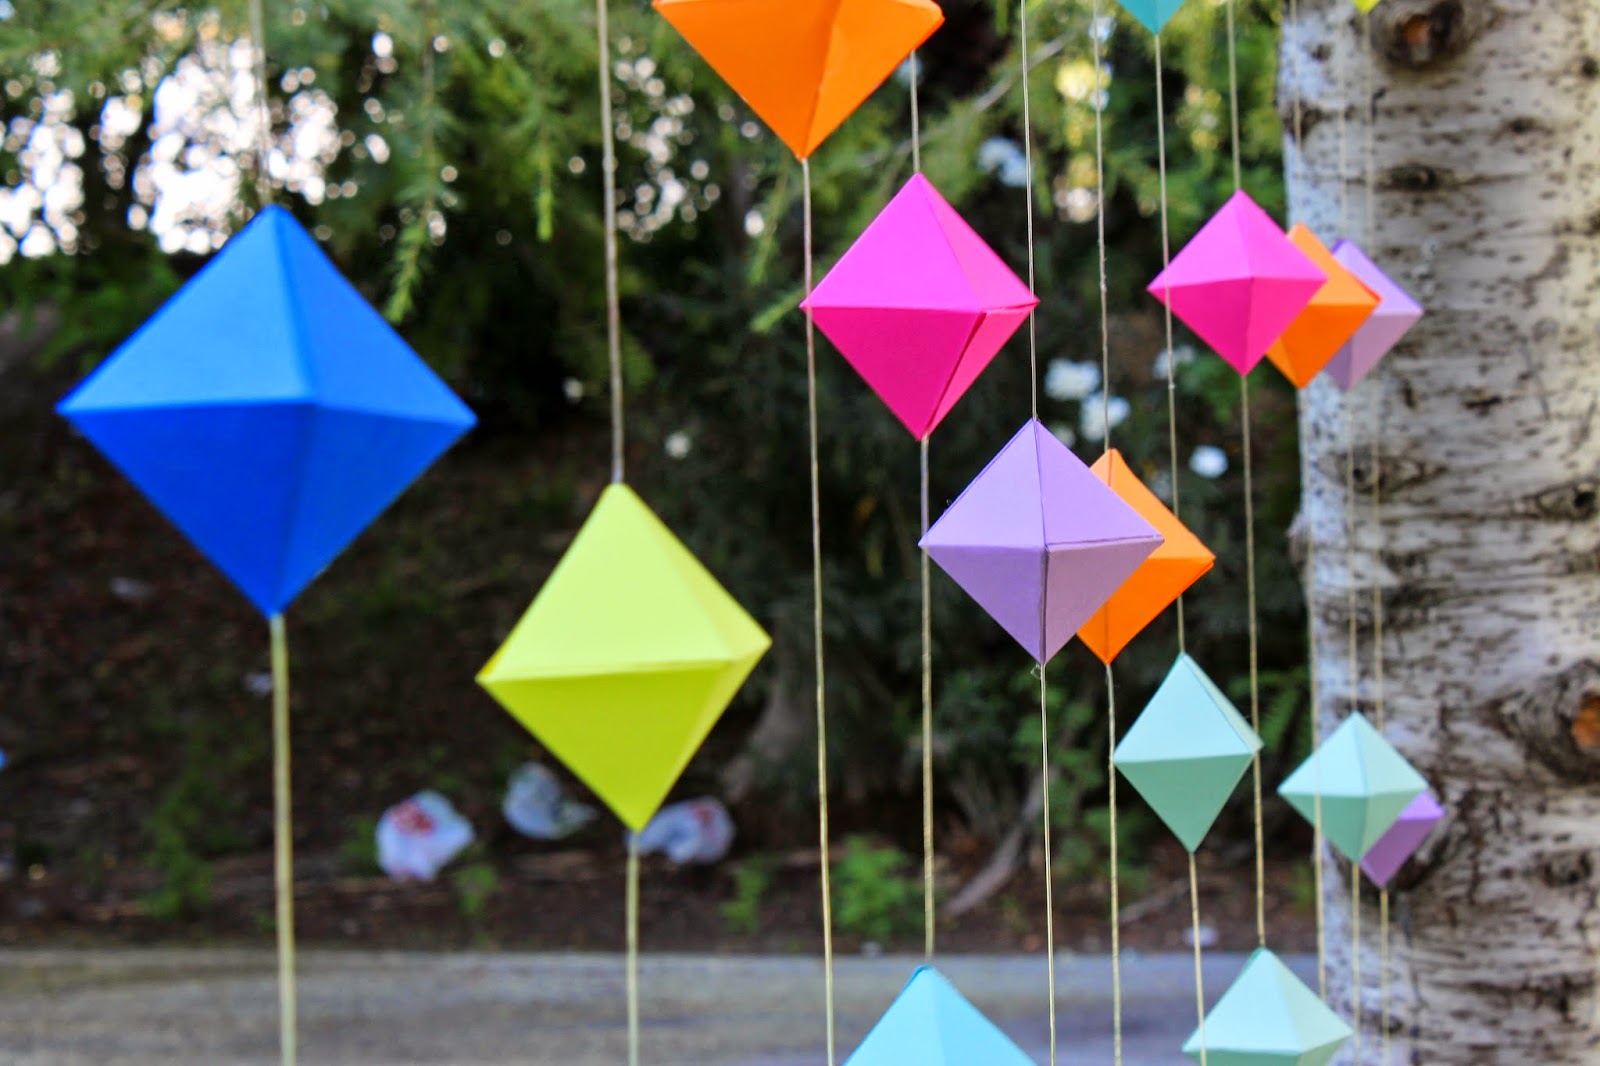
I decided to have a Big Ol' Picnic and BBQ style birthday party at Weddington Park in Studio City. I was inspired my this Geo-Curtain Photo Backdrop I saw on Pinterest. This couple used a HUGE one for their unconventional Valentine's Day wedding. You can buy the curtain off Etsy, but I decided to make my own for a much cheaper cost. 

First I found the Geo-triangle shape I needed from this lady's wonderful blog: http://www.kristimurphy.com/blog/mothers-day-diy

1. Print the triangle printable onto card stock paper (bought from Michael's) in the colors of your liking.
2. Cut out the triangle shapes and folder them along all the dotted lines.


3. Use a clear string to hang the geo shapes from. I used a clear stretchy string used for making bracelets from Michaels. Fishing line could also work. I measured out 8 foot long strands and made them all somewhat different lengths so my backdrop would have a random pattern going on.


4. Tie knots where you want your geo shapes to hang from. I spaced my triangles out at all different lengths like the one pictured on Etsy
5. This part takes practice! I figured out which order of I should glue the sides down so the string went straight through the middle of the triangles while resting on the knot that I had tied. I used a hot glue gun so it would dry instantly. 


 6. I made about 12 strands with all different color orders and spacing. 
7. I found a tree near my picnic tables to hang the strands about 4 inches apart to create my photo booth backdrop. 


It turned out really well and everyone loved it!


 =)


Sunday, June 15, 2014

Layered Cake with a Chocolate Cage (and bunting decor)!

Hey You,

I was SO EXCITED with how this cake turned out!! This is the first time I have ever baked a layered cake, yet less with awesome decorations. I was determined to make a fantastic birthday cake for my lovely friends Rachel Hall and Grant Hall. This is by far the coolest thing I've ever made.

This is how I made my cake! I'll show you in sections. 
1. Layering the cake
2. Chocolate cage
3. Bunting decoration
I made a red velvet cakes with cream cheese icing (Rachel's favorite). I bought 2 red velvet cake mix boxes and 2 cream cheese tubs from the grocery store. I just followed the instructions and ingredients from the box. Yeah, sorry...I didn't make it all from scratch. One step at a time!

I used two 9 inch circle pans to bake the layers. Their baking time was around 30 minutes.

Toothpicks were my best friend here. I used them to make sure the cakes were done in the middle and on the sides. 

The cakes rose in the oven a lot more than I thought they would. It made me sad because I knew I would have to chop off the "muffin top" to make the cakes level. 


I had to wait for both cakes to cool before cutting the muffin tops off. I did try eating a little of the remains because I felt bad for just throwing it away. It was tasty.

Next, I plopped a decent amount of icing onto the first layer to use it as glue to hold the 2 layers together.

I flipped the 2nd layer over so both cut sides (Severed muffin tops!) were facing the middle. That way I had a smooth even layer for the top of the cake!

This is where it got fun. =)

I FELT LIKE CAKE BOSS!
As "Buddy" from Cake Boss says...I "dirty iced the cake" and put it in the fridge for about 5-10 minutes.

Then I was able to put about 1.5 tubs of icing [nom] on the cake for the final layer. I did try a few icing techniques but gave up on them pretty quickly. I need to invest in some tools like Buddy has.


I didn't want it to look perfect. Especially since I determined to make the Chocolate Cage work.
So this part I was really excited about but also nervous. I didn't want to ruin my awesome cake! Making a chocolate cage is a little difficult. It's all about dimensions and timing.

I measured the circumference of my cakes to be 28 inches. I cut it in half to 14 inches because I figured it would be easier to put on the cake in 2 pieces. I also measured the height of the cake to be about 3.5 inches. I went ahead and made my Chocolate Cage Swirl template 4 inches so the chocolate would stick up higher than a cake a little bit. I used non-stick parchment paper to create my template.


I melted a lot of mini chocolate chips and scooped them into a large zip lock bag. I used this as my chocolate swirl marker by cutting the corner tip of the bag. Cut smaller than you think! I made the mistake of cutting it too big and had to start over. 

There was a lot of trial and error with this cake.

Finally I got to work and started SLOWLY swirling the chocolate in large ovals. (If you squeeze the chocolate out too quickly it comes out all squiggly and funky.


I wanted to make sure there was plenty of overlap so the chocolate would have something to hold on to. I wanted the chocolate to be thick enough to stand up once it hardened. 
My technique: Making large oval swirls from top to bottom all the way across then going BACK over them with smaller swirls on the bottom to make the chocolate cage stronger.


This is where TIMING IS KEY.

I trimmed down the parchment paper along where the chocolate started. I put both stripes CAREFULLY into the refrigerator for 3 minutes. You DO NOT want the chocolate to hardened too much. It needs to be flexible for you to bend around the cake. This part was tricky for me because my kitchen was so warm at this point. The chocolate kept melting quickly so I had to work fast. 

I put 1 chocolate strip around the cake and pushed gently into the icing. I put the cake in the fridge for a few minutes then took it out to put the second chocolate strip on. 
I left the cake in the refrigerator with the chocolate and parchment paper on for 1 hour. After an hour I was able to remove the parchment paper easily and the chocolate swirls stayed on the cake. 

I GOT SO EXCITED AT THIS POINT BECAUSE IT LOOKED SO COOL! I was extra careful and left my cake in the refrigerator for a few hours so it would not melt.

Then I had a cake photo shoot.


I had never heard of "cake bunting" before until I saw it trending on Pinterest. There are so many cool ways people use bunting to decorate all sorts of things! I decided to have mine say "Happy Birthday" and used 2 wooden skewers I bought in a pack at the grocery store.

First I found a template to help me cut out my little flags to spell out 'Happy Birthday.' I used this print out: http://www.yellowblissroad.com/printable-chalkboard-alphabet-cake/
I cut out one of the flags and traced the shape onto scrapbook paper I had. I do like the chalk board look, but I wanted something colorful for this cake. 

I used string and glued the flags around the string to spell out "Happy Birthday." I added some more colorful string pieces to make it more colorful.

The finished product looked mighty fine. ;)


How it all came together!
This cake is the coolest thing I've ever baked. I was so happy with the outcome! 
Thanks for reading!! =)

Wednesday, November 6, 2013

Daenerys Targaryen Costume: Khaleesi


Winter is Coming. 

So I decided to be an over achiever and make a Khaleesi costume from scratch for Halloween this year. It was not an easy task, and not cheap. First, I could not find a single person in the Los Angeles area that owned a sewing machine that I could borrow. So, I ended up buying a Brother CS6000i sewing machine from Amazon. It was originally about $450 and I got it for $150 because apparently September is "sewing month." Who Knew?!

After I finally got the machine to help us create this glorious costume, Kathryn Begle, who was the brains behind this operation, and I went to Jo-Ann Fabrics to buy all the fabrics, muslin and thread we needed. Luckily, Kathryn already owned an impressive sewing kit with pins, needles, seam ripper, etc. The picture above shows the sewing machine I bought, the burlap fabric for the top and front section of the skirt, the tan fabric for the main part of the skirt, a light fabric for the top of the skirt and a small piece of dark brown fabric I used for the gloves.

For the top, I bought a cheap strapless bra and Kathryn sewed the burlap fabric to it so I would have some structure to it. I braided strips of the burlap and used that as the lining at the top and for the strap to go around my neck. I had 2 layers of burlap sewed onto the front part and cut them unevenly into a V shape to look similar to Khaleesi's outfit. I used this website: http://screencapped.net/tv/gameofthrones/ to find screen captured shots of Khaleesi wearing different outfits and from different angles. These were my main inspirations.

The Top

The Skirt

Pants
From Macy's
 
Gloves
I distressed the burlap using a seam ripper. I would randomly cut parts and pull out the burlap to make it look snagged and worn. I tried using make up to give the dirty look to my skirt, but it clearly looked like make up smeared on it. So, I went outside and put dirt in a cup and got it damp and whipped or dabbed it onto my skirt to make it look dirty.
I went all out and made the gloves that Khaleesi wears, like once, in the show. I used snaps on one side of the gloves to make them fit around my wrists.

The Wig was by far the most expensive part of the entire costume. I reallllly wanted to make my own hair white, because I knew it would have looked way better. I tried using soft chalk, but it didn't really show up on my hair. I also tried using white hair spray, but it just made it look gray and sticky. So, I knew I would end up having to buy a wig, sadly.

I went to Hollywood Wigs off Hollywood Blvd after reading great reviews on Yelp. (I have also written one myself). The lady there, Christine, knows her stuff and was very helpful. I was able to email her pictures of Khaleesi's wig and hairstyle. She was able to style it by putting in 2 braids for me and loose curls. I thought it looked great from the back, but kinda mullet-like / old fashioned judge-like from the front.

I even had a baby dragon! =)


Friday, September 27, 2013

My Washi Tape Wall


Hi again!

Remember I said I'd have another project to post using Washi Tape? This is it!

What is Washi Tape, you ask? (I didn't know either...until recently).

Washi 和紙 is a style of Japanese paper tape that started in Japan, but manufacturing has now spread throughout the world. Washi comes from wa meaning Japanese and shi meaning paper, and the term is used to describe paper made in the traditional manner, regardless of where it’s manufactured.


It is really growing in popularity. Washi tape comes in so many colors and patterns. I bought a Washi Tape Pack from Cutetape.com. Also, Etsy.com has many shops selling Washi Tape as well. You can use Washi tape for decorating just about anything because, like masking tape, it is not permanent. Many people use it for wrapping presents as well.


I bought the Classiky Washi Tape 12 pack because I loved the variety of colors. I found inspiration to use it on my wall from this lady's blog: annkelle.com. I love her site! It's so bright and colorful...which is right up my alley.


Like her, I did not plan out the color order. I liked the randomized colors. She also pointed out that washi Tape is very forgiving. So true. It stays sticky even if you have to peel it off a few times to get it straight. It isn't rip-able like regular masking tape. I used scissors to cut the ends. 


I love how my wall turned out! It brings a splash of color to my room without the commitment of paint.  It's a great way of decorating an apartment! I'm already planning on using my Washi tape in other parts of my apartment, if my roommate gives me permission. ;)


Monday, September 23, 2013

Masking Tape Makeover

Ello Govena'! 

Once again I have to thank Pinterest for inspiring this project of mine. I never thought of using Masking Tape as form of decoration until I found this pin: 23 Ideas For Apartment Decorating. Scroll down and you'll see the kitchen decorated with black tribal looking designs. I thought this was an amazing idea. It's cheap and not permanent. You can easily remove it when you move out of your apartment.

My roommate and I are always looking for ways to bring life to our very bland, neutral, blah colored apartment. I thought, using colorful masking tape would be a great way to bring a splash of color to our kitchen area. I used 5 different colors of Scotch Expressions Masking Tape, and regular blue painters masking tape. I had to go to a few different stores (Staples, Micheals, Office Max, Home Depot) to find different colors. It seems to becoming more popular and Scotch has now made many different colors and patterns of Washi Tape. (I recently ordered a pack of Washi Tape on Cutetape for a future project to do in my room. =D Stay Tuned)!


This was my Summer project that I finally finished today! It was a slow process because I kept running out of pattern ideas! I had to look at magazines and on Pinterest for inspiration.
 I decided to get fancy with one of the cabinets and created a beach picture. It was very time consuming. I spent many hours sitting on the couch watching Netflix cutting masking tape into these designs. I thought they turned out really well!
So far everyone who has seen my kitchen in person loves it! I'm so happy it's finally finished! Hope this has inspired you and your next project.

Be seeing you,


Sunday, January 27, 2013

Paint Swatch Wall

Happy Weekend! 

Kathryn Begle and I have completed another Pinterest inspired project for our apartment! 

Pinterest Inspiration: Paint Swatch Wall

I actually found this quite a few months back, but I just never thought of actually doing it. One day I yelled, "Kathryn, can I do this." She leans over to look at my Pinterest decor album and says, "Do it." So we became starving artists and made what is free art essentially.

It just takes a sneeky "theft" to successfully nab the entire rainbow of swatches from paint stores. I went to Lowes (3 times), Home Depot (2 times), and Mark's Paint Store (1 time). Keep grabbing swatches until you have a pretty impressive rainbow of each color. Tip: Don't forget the in between (blended colors) like yellow-green, blueish-purple, etc cause I had to go back again to get more. 


I copied the lady from the Pinterest picture and taped my floor with the dimensions of our wall. From there I was able to plan the layout of all the swatches (and see what I needed more of). I think if I tried winging it and immediately started taping the swatches to the wall, it would have been horrible. This step is very important. I tried doing a diagonal effect like the lady, but as you can see it didn't really go so perfectly, but I knew the TV would cover up a lot of the bottom. 


Progress!
To remember my spacing of each swatch, I took a picture of each color section from the layout on the floor. I put the pictures on my computer so I was able to reference them each time I taped a new one up. This is really a two person project. Kathryn nicely taped every swatch and handed them to me, one by one, as I taped them on the wall. The only expense of this project was the tape. I just bought a 4 pack of tape from Target, and we used about 3 of them. 

3 Hours Later...
(and a food break)

Ta Da!